I'm not impressed. I spent over two hours doing this post yesterday and I even had the email on hand to send to the award recipients to spread the joy. I put it on schedule but I tried to look at it on my phone, whilst I was out this afternoon but it's not here. It almost ruined my afternoon. I'm off now to try to find/recover it.
Thankfully I did have a lovely afternoon despite this potential nightmare.

My little space to enjoy all things crafty in my life
Sunday 22 April 2012
Saturday 21 April 2012
More Spring Jubilee
Hello there
I'm a happy girl as I've been able to play with the Pink Paislee Spring Jubilee collection again. It's a birthday card for Chris's mum.
The card base was 25 x 14 cm. The blue patterned paper was cut at 5x13.5cm. The yellow paper was cut at 7.5 x 13.5cm. I then used my paper trimmer to cut the wavy line down a thin strip of the blue patterned paper.
The circular flowered mat was supplied with the paper kit.
The flower was cut from Flower Shoppe cartridge - I used the Cricut Craft Room, so not certain of all the sizes but the largest one was about 5cm square. It's the heart2 flower. I used a 8mm pearl brad as the centre.
The leaves are from the same cartridge -exotic5 - size 5.8x5cm.
I added the ribbon, just because I wanted to and I thought the colours went well.
The frame and the sentiment stamps are Stampin' Up but the butterfly one is part of a set I got from Cardmaking and papercraft magazine. I used 'worn lipstick' distress pad to edge and to stamp with.
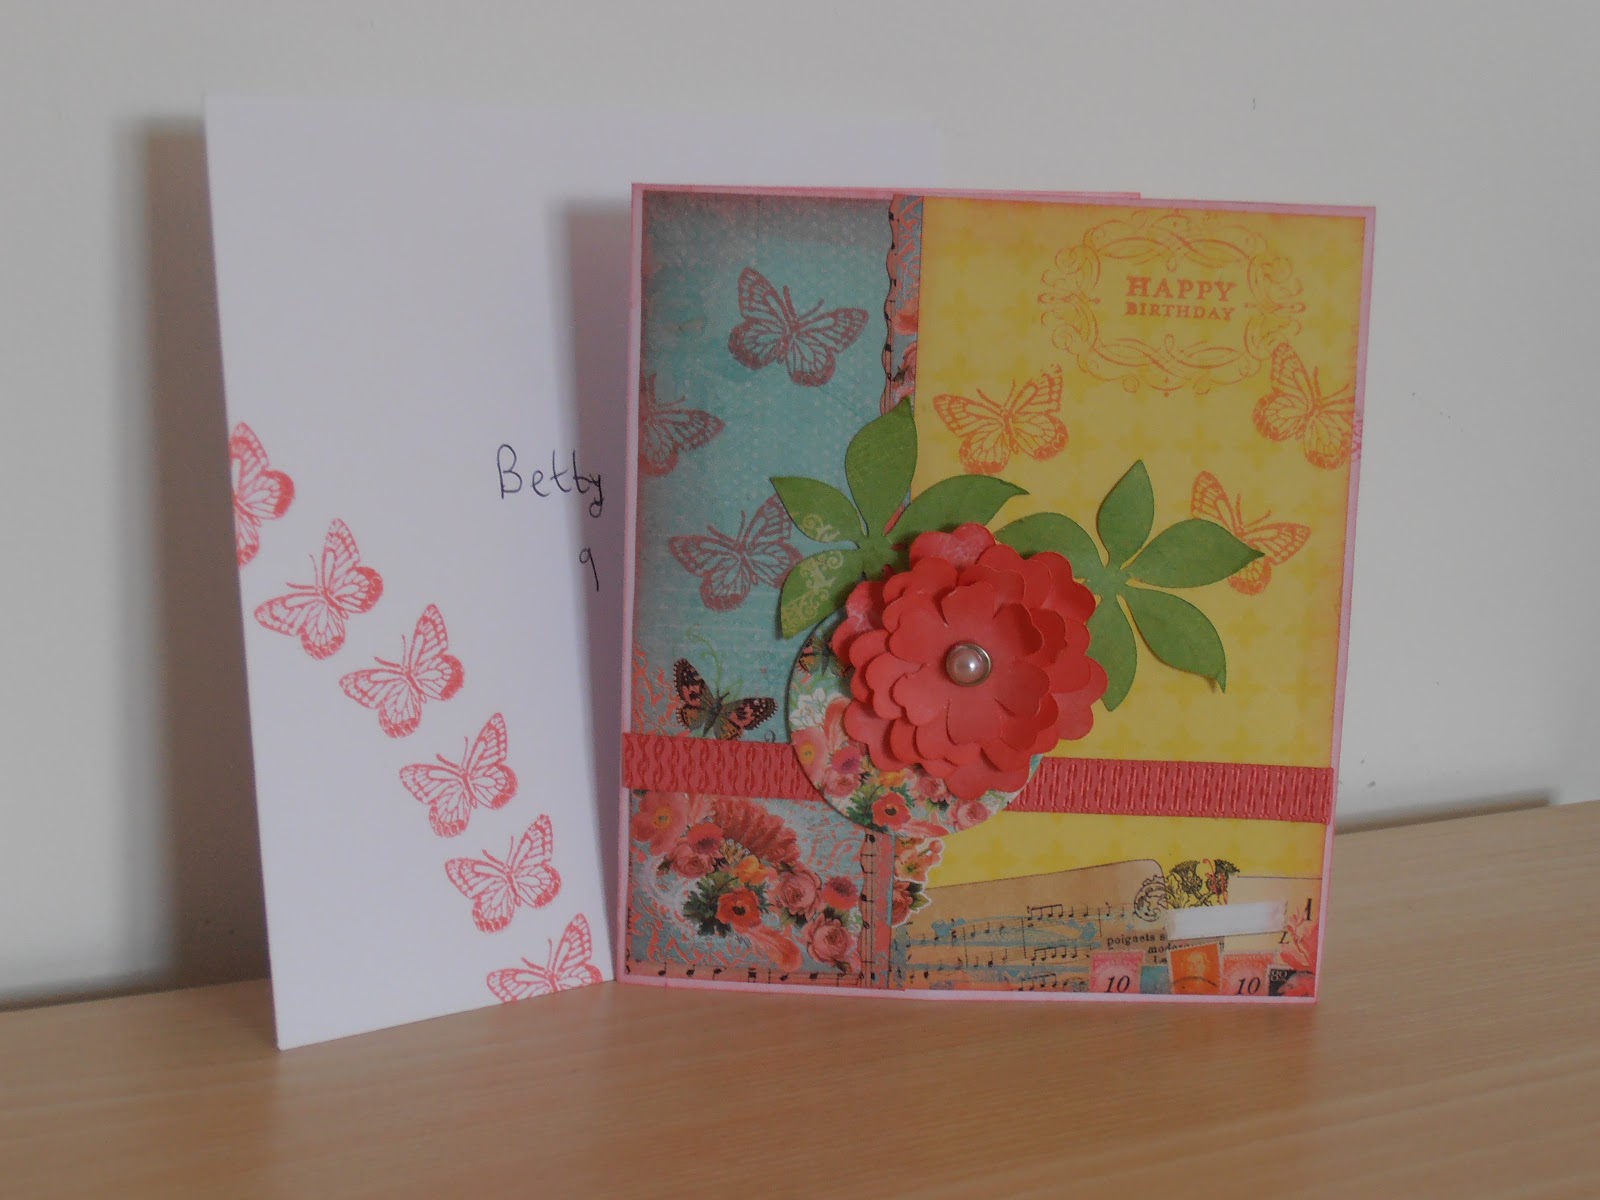
This will need to go in the post so I was only able to stamp on it - do you like the pretty butterfly arch? :-)
Take care out there
Thursday 19 April 2012
Steampunk train
Hello there
 I've ventured into the world of Steampunk again for my cousin. I used my Tinkering with Steampunk cd-rom again. It's a great cd-rom in many respects but I had real trouble with the printer options. In the software I selected A5 paper size but when I went to print it, I selected A4 as that is what I was printing with, as that meant that I could use it as an A5 card. Unfortunately I tried a couple of times, wasting much ink but it kept printing it as A6, so I had to stick to that. Next time I must just take the items I want into Craft Artist and work from there, as that software is so much more intuitive and logical.
Incase you're reading this and hoping for details on what I used. Here's a list of the things I can remember.
Background consists of background 78. I shrunk it down and then copied several times (placed next to each other)to get the bubble wrap print effect into the other background, which is number 27.
The clock is image 14.
The cog is image
The tag is from the tag folder and is number 7. I changed the colour to suit what I wanted and added the text in 'English 157 BT' font.
The phrase 'Time is a great storyteller' is image 134.
The arm is image 146.
The train is image 3.
I printed the clock and the cog separately. The clock just went on as it was, raised by the glue but I inked the cog with vintage photo and then embossed it to give that proper metal finish and raised that with Pinflair glue as well.
My original inspiration came from Cazz in her blog.
Take care out there and Paul, hope that you did have a great day and we must organise a dog walk together soon x
Wednesday 18 April 2012
Wednesday mini-challenge
Hello there
Oh boy, what a day! I found out this morning about the challenge theme for today's mini-challenge over on The Crafty Network's Facebook page. You had to create something handmade related to St.George's Day, which is on Monday 23rd. It doesn't have to be something made on the day but since I don't have anything I've made that is remotely linked to St. George, I had no choice but to make something off spec.
Thankfully I had some material to hand which I think worked a treat. The white material is up-cycled from a valance which is too small for my current bed.
I had to hand-cut the crown, as none of my Cricut cartridges have a crown which I think is suitable to cut material with. I thought of it too late to add one to the placemat as well as the coaster but since I used the same material for the crown as I did for the cross, I think that blends them both nicely. The back of the coaster is the same material as I made the bias binding with.
This is the photo I entered into the challenge. Even this was difficult to decide which one to show.

You have to get your entries in before midnight and I posted mine at 11, so I'm mighty chuffed. I haven't taken the dogs for their evening walk tonight but hopefully they'll forget about that very quickly. Considering that I woke up this morning with no idea that I'd be entering this challenge, I am very pleased with the outcome. I didn't actually start doing it until this afternoon.
I completed the challenge for a few reasons. One of those reasons is because I thought it was good for me to do something quickly. If I start making these for a business, I may well get a customer who needs her/his order rather quickly, so I wanted to see what I could achieve under pressure. I will make five more of both and use them myself at home. There'll only be Maggie and I here on the Monday but I still think they'll be good for all the Jubilee celebrations that are going on.
Wish me luck and take care out there
Date of writing - 18th April 2012
A birthday mini album for my sister
Hello there
Yes! I've done another magnetic closure mini album. I had to watch the tutorial video again but the making of it was alot smoother this time as I knew what I was playing with. See my blog post in February to see the instructions for the actual making up of the album. I'll run through page by page some of the things I played with whilst making this one.
The front has embellishments printed out from a kit called Turkish Delight on Craft Artist and I've covered three of them in Glossy Accents. I did try waxing the purple tag but it didn't look good
The masking has turned out well but it's a Tim Holtz flourish mask and I'm just not used to using them; I only got this last week. I used the pearl dabber as the medium, as it's almost invisible without light shining on it, so that suited the nervous me incase it didn't work out. I thought the tassle inside the flower was genius as it also helps open the magnetic flap and it looks pretty.
The little flower circle hanging from the pink flower is a shrink plastic flower I made, so whilst writing this blog I looked at the original 'final' version and had a light bulb moment - 'ah ha, I can stamp with the same stamp as I used on the shrink plastic embellishment'. That's how come there are two 'final' versions.
 I've kept the next two pages plain really, so my sister can do as she pleases with photos, tickets or other memorabilia from her holiday to Turkey last week. The phrase across the two pages is on tissue paper and is from a download I got from Heidi Swapp's blog.
The left hand page has got another element from the Heidi Swapp download on it but this time I inserted it to Craft Artist and made it become part of the paper. On the other side, yet another Heidi Swapp inspired item is the little flip album I've put on there.
I printed an image from the Turkish Delight digikit onto the front but I just stamped 'photo' on each page inside to indicate to Claire a possible way of utilising the little book


Yes! I've done another magnetic closure mini album. I had to watch the tutorial video again but the making of it was alot smoother this time as I knew what I was playing with. See my blog post in February to see the instructions for the actual making up of the album. I'll run through page by page some of the things I played with whilst making this one.
 |
| First 'final' edition |
 |
| This has to be the final final version :-) |
 |
| not good! |
The masking has turned out well but it's a Tim Holtz flourish mask and I'm just not used to using them; I only got this last week. I used the pearl dabber as the medium, as it's almost invisible without light shining on it, so that suited the nervous me incase it didn't work out. I thought the tassle inside the flower was genius as it also helps open the magnetic flap and it looks pretty.
The little flower circle hanging from the pink flower is a shrink plastic flower I made, so whilst writing this blog I looked at the original 'final' version and had a light bulb moment - 'ah ha, I can stamp with the same stamp as I used on the shrink plastic embellishment'. That's how come there are two 'final' versions.

 |
| Me likey! :-) |
The left hand page has got another element from the Heidi Swapp download on it but this time I inserted it to Craft Artist and made it become part of the paper. On the other side, yet another Heidi Swapp inspired item is the little flip album I've put on there.
I printed an image from the Turkish Delight digikit onto the front but I just stamped 'photo' on each page inside to indicate to Claire a possible way of utilising the little book

The next page has a digi frame with a photo from Claire's holiday in there and the presents etc on the right hand corner are also digi-created but look gorgeous IMHO. The right hand side page has another waxed element on it i.e 'sparkle'; a tag created from the digi kit and a section printed for the photo.


The very last page is blank again but the left hand side page has a pocket for the journalling tag I put in there, which matches the tag from the previous page but a different size of course. 'Love this' is another waxed element and from the Heidi Swapp download again. The tissue paper tape is from Tim Holtz of course; it's one of the sketchbook ones and it's the first time I've got round to/remembered to using to.
So that's it. By the time this gets posted, my sister will have received it, so I can only pray that she likes it and enjoys putting her things in it to remind her of her holiday and her birthday
Take care out there
Date of writing- April 14th 2012
Monday 16 April 2012
Welcome to Europe
Hello there
Now here's a card I doubt I'll be sending again anytime soon with a sentiment like that but the card and the papers are lovely. The card is for my Australian friend who I haven't seen in over 13 years. She's currently spending two weeks in Italy partly 'studying' an Italian method of early childhood teaching although Lu- Ann has been teaching for a long time now. Unfortunately I still won't be able to meet up but I feel the need to send her a little card.
 I got my initial inspiration from the Cardmaking & Papercraft magazine which supplied the paper pad as a freebie along with the gorgeous matching die cut embellishments. The paper is from Pink Paislees 'Spring Jubilee' collection and it's gorgeous with a capital G! This pad is good as there's just 6 designs but 36 sheets, so you get loads of options of what to do with each sheet. I usually get in such a lather if there's a paper I want to use but I'm scared of ruining it since there's usually only one of each design.
I've made the card my own by using my own die-cutting designs. The scalloped circles behind the butterfly circle were cut from 'Sweet Treats' Cricut cartridge at 4.5cm; flower1 with the shadow/blackout feature key. The butterflies were cut with the Paisley cartridge using the umbrella key with layer 2 function key at 8.5cm (the size is so large as it's a design which is meant to be used as a layer not a main feature). I've had that teal coloured organza and raffia ribbon for over two years now and never used it as I forget about it. I was given it as part of a huge box of crafting goodies I was given when I finished work.
Now all that's left to do is hope that Lu-Ann has a great time.
Take care out there
Date of writing- April 11th 2012
Now here's a card I doubt I'll be sending again anytime soon with a sentiment like that but the card and the papers are lovely. The card is for my Australian friend who I haven't seen in over 13 years. She's currently spending two weeks in Italy partly 'studying' an Italian method of early childhood teaching although Lu- Ann has been teaching for a long time now. Unfortunately I still won't be able to meet up but I feel the need to send her a little card.

I've made the card my own by using my own die-cutting designs. The scalloped circles behind the butterfly circle were cut from 'Sweet Treats' Cricut cartridge at 4.5cm; flower1 with the shadow/blackout feature key. The butterflies were cut with the Paisley cartridge using the umbrella key with layer 2 function key at 8.5cm (the size is so large as it's a design which is meant to be used as a layer not a main feature). I've had that teal coloured organza and raffia ribbon for over two years now and never used it as I forget about it. I was given it as part of a huge box of crafting goodies I was given when I finished work.
Now all that's left to do is hope that Lu-Ann has a great time.
Take care out there
Date of writing- April 11th 2012
Monday 9 April 2012
Scrapping with friends
Hello there
Last week I was invited to a friend's house to craft, chat and have a couple of drinks of .... hot chocolate?!!... naaaah, you'll never believe that..... wine :-)
I was supposed to be there at 7 so I was getting prepared well in advance at 6.45!! Tut tut at me. I knew which colours I wanted at that time but I didn't know which photos. Thankfully I very quickly decided on the Mother's Day ones, so I printed them off. As ever nothing ever goes smoothly; the settings on the printer were for basic print not photo print, so came out full of lines which isn't good. I sorted that out and just printed them off at 6x4in for ease.
I also printed off some things onto tissue paper (order from Sarah's cards and they give you your goods wrapped in white tissue paper - genius!). I've been watching Heidi Swapp's ustream recording for her Memory Files range. It's an excellent video which is an hour long and her style is relaxed yet professional. She inspires me. See Heidi's ustream page to watch it
I also printed off some papers from MyCraftStudio free download as Stephanie Weightman has moved to QVC and they supplied the Quintessentially Country Garden download as a sweetener to get people to watch. I love the papers as the colours are teal and brown (my faves at the moment). I can't find the page again I'm afraid but maybe they've withdrawn it.
Thankfully my craft tote was full of stuff, so that was quick and easy.
Thankfully also Catherine only lives round the corner but I went in the car as I took some lemon meringue pie with me too - maybe I was trying to bribe my friends to help me out but in all fairness only two of them could eat it for various reasons, yet they helped me anyway; that's good friends for you.
 This is what it looked like when I left Catherine's. I didn't end up using the papers I'd printed off as they were A4, so didn't fit on the 12x12 card base I'd taken. Helen was kind enough to let me have that strip off some of her Stampin' Up papers. Helen also shared a layout suggestion on her fancy new phone. The 2012 and 'love this' pieces are from the Heidi Swapp free download I got from her blog. I used a strip of the white tissue and created a tassled look with it as I've enjoyed seeing that on several layouts. I should've coloured it first with the Stampin' Up Baja Breeze pad Catherine let me use but that would've been too easy :-). Jackie and I discussed how to make the tassle look clearer but I ran out of time at home basically (where the rest of the tissue paper was), so I had to leave it as it was. Jackie gave me the idea of putting something in that top right hand corner as it had looked bare. I thought she would put one of her nice doodles but she suggested using Mara's die using the same paper as my vertical strip. So I did and very happy with it I am. I had to lay the photos like that really as the middle photo has shadow over Mum and Maggie's legs, so this way hides that shadow.
 When I got home I put some gorgeous blue glitter onto a button for the centre of the flower. I also used some thickers for the title 'Mother's day' and used my speckled egg and the Baja breeze stamp to colour them. On hindsight, I think that title could do with some sort of background to help it stand out more but hey ho, I've left it like it is now as time was against me at the time too. I wanted it finished that night to give me a sense of achievment.
On the excellent advice of Jackie, I did some 'flash' stamping on the page too. By that I mean not stamping carefully but just leaving vague imprints on the page. I chose a flower stamp for that and chose the same colours as the alphas. Another thing I did was put some basic doodling/shading around the photos and inked around the page too. The journalling went on last.

Take care out there
Last week I was invited to a friend's house to craft, chat and have a couple of drinks of .... hot chocolate?!!... naaaah, you'll never believe that..... wine :-)
I was supposed to be there at 7 so I was getting prepared well in advance at 6.45!! Tut tut at me. I knew which colours I wanted at that time but I didn't know which photos. Thankfully I very quickly decided on the Mother's Day ones, so I printed them off. As ever nothing ever goes smoothly; the settings on the printer were for basic print not photo print, so came out full of lines which isn't good. I sorted that out and just printed them off at 6x4in for ease.
I also printed off some things onto tissue paper (order from Sarah's cards and they give you your goods wrapped in white tissue paper - genius!). I've been watching Heidi Swapp's ustream recording for her Memory Files range. It's an excellent video which is an hour long and her style is relaxed yet professional. She inspires me. See Heidi's ustream page to watch it
I also printed off some papers from MyCraftStudio free download as Stephanie Weightman has moved to QVC and they supplied the Quintessentially Country Garden download as a sweetener to get people to watch. I love the papers as the colours are teal and brown (my faves at the moment). I can't find the page again I'm afraid but maybe they've withdrawn it.
Thankfully my craft tote was full of stuff, so that was quick and easy.
Thankfully also Catherine only lives round the corner but I went in the car as I took some lemon meringue pie with me too - maybe I was trying to bribe my friends to help me out but in all fairness only two of them could eat it for various reasons, yet they helped me anyway; that's good friends for you.


On the excellent advice of Jackie, I did some 'flash' stamping on the page too. By that I mean not stamping carefully but just leaving vague imprints on the page. I chose a flower stamp for that and chose the same colours as the alphas. Another thing I did was put some basic doodling/shading around the photos and inked around the page too. The journalling went on last.

Take care out there
Sunday 8 April 2012
Placemats and coasters
Hello there
I had friends round for dinner last night and so the pressure was on (pressure only created by me I have to admit) to make new placemats and coasters for the Spring season. The weather has reverted back to awful rainy, miserable greyness, so some happy colours were definitely in order. The blue is alot darker than I wanted really but that's my fault for shopping for fabric online and rushing to make a decision. I bought from online-fabrics, which I have done before and they're reliable and approachable which I appreciate. Recently I've found seamstar as well but haven't used them yet to give any sort of opinion on their service but I love the look of the Domestic Bliss Vintage Inspired range they've got 'new in'.
This post will serve as a kind of tutorial for me and anyone else interested but if anything doesn't make sense or you're unsure, please don't hesitate to contact me. I always find with any sort of tutorial that you have to actually try to do something yourself, not just read about it online for it to make sense....... My daughter recently watched a 'Big Bang Theory' on tele and one guy on there had tried to learn to swim by reading online! Sufficive to say, he'd actually have to get wet to actually swim himself......


Done! And in time for my dinner guests, so we had a good night of catching up on events

I had friends round for dinner last night and so the pressure was on (pressure only created by me I have to admit) to make new placemats and coasters for the Spring season. The weather has reverted back to awful rainy, miserable greyness, so some happy colours were definitely in order. The blue is alot darker than I wanted really but that's my fault for shopping for fabric online and rushing to make a decision. I bought from online-fabrics, which I have done before and they're reliable and approachable which I appreciate. Recently I've found seamstar as well but haven't used them yet to give any sort of opinion on their service but I love the look of the Domestic Bliss Vintage Inspired range they've got 'new in'.
This post will serve as a kind of tutorial for me and anyone else interested but if anything doesn't make sense or you're unsure, please don't hesitate to contact me. I always find with any sort of tutorial that you have to actually try to do something yourself, not just read about it online for it to make sense....... My daughter recently watched a 'Big Bang Theory' on tele and one guy on there had tried to learn to swim by reading online! Sufficive to say, he'd actually have to get wet to actually swim himself......

- I cut the dotty material 10 x 13 inch. Measure a plate first to see how big you want your placemats and also check that they'll fit neatly on your table along with the coasters. Use templates if necessary, then it'll also be quicker for the next set of placemats you make.
- Cut your backing pieces at least an inch bigger to allow for laying down of the 'sandwich'
- Cut your webbing/batting an inch bigger than your front piece too.
- I cut the flowers on my Cricut using the Walk in my Garden cartridge. Size 2in I think it was.
- Lay your backing piece right side down - tape it to your work surface with low tack tape, put your webbing down on top of that and then place your front piece centrally on the top. Use pins or much better still, use quilting safety pins (the bendy ones) to connect all three layers together, trying to prevent any wrinkling of the fabric.
- Remove tape
- Machine sew your quilting lines, again trying to manoeuver the fabric the best you can to avoid sewing wrinkles in.
- Iron on your 'heatnbond' backed die-cuts to the front of your design. (Ask if you're not sure how to do this but it does explain on the packaging. Remember to buy the Heatnbond lite, so that you can sew through it.)
- Use your transparent quilting ruler to help you to cut off the excess from around the front piece, so all layers are the same size. Cut down one side using the lines on the ruler and on your mat to make it as straight as possible and then turn it around one turn (straight edge on the top) and place a line from your ruler along that straight edge you just cut and line up your fabric on the right so you're cutting as little as possible off the top layer of fabric and cut through all layers. Repeat for each edge.
 |
| I have a rotary cutter but not a large enough self healing mat - yet more shopping required. .... don't let these things stop you from making though - go for it! 'Mend and make-do' as my Gran's old saying goes. |

- Machine sew the die cuts in place. I don't have a free-hand embroidery foot for my machine, so this bit was not fun for me but hey ho, improvise as necessary; work through any difficulties you face with charm and dignity..... or much grumbling and whingeing about needing a free hand embroidery foot like I did :-)
- Now for the fun bit - is my sarcasm evident?!! Bias binding - booooooooo hissssssss! I don't think this is the right post for me to run through how to do that, so watch this space for a future post dedicated to the awful thing that is making and attaching bias binding. You can always buy bias binding of course but if you want to have binding which matches your fabric and uses left over fabrics, you have to make your own of course. Machine sew the binding onto the front of each placemat. I then trim the fabric overhang behind the binding, so as to lessen the density of fabric that the binding has to go over, which makes the hand sewing easier.
- Handsew the binding over on the back. I allow about half an hour to sew the back of each placemat - yes; it is time consuming!

- Now for the coasters. Firstly a practical point. These coasters are padded of course so please make them slightly bigger than you would think. This is to allow for things like wine glasses; with not so wide bases to sit comfortably on there. You don't want your bubbly spilling all over the table, your guests, your floor, your placemats, the dog... you get the message :-)
- I cut my layers (front piece, wadding and back piece) all the same size this time at 5in. The batting goes on the bottom, one piece of fabric in the middle with the right side facing up, and one piece of fabric on top with the right side facing down.
- Iron on your die cut pieces. N.B I purposefully don't quilt these, as again it's linked to the stability of your drinks on the coaster. I.M.H.O to create too much quilting on the top, forms too many bumpy surfaces, which could make it useless for placing a cup/glass onto securely. I machine sewed the die cuts on.
- Machine sew .25in around the edges of the coasters but leave at least an inch gap on one edge, to allow you to turn it inside out.
- Turn your piece inside out ensuring that the batting goes in the middle of the two fabric layers.
- Hand sew over the gap.
- Machine sew all around the coaster about .25 from the edge. I like the border look this provides, to link in with the placemats which have the binding as the border. Use the same coloured thread as your binding to confirm this link.
Done! And in time for my dinner guests, so we had a good night of catching up on events

Take care out there
p.s see my earlier post about making a napkin box for the Spring too
New napkin holder
Hello there
A quick post for now. I've done the latest model of napkin holder today. A spring theme of course and it matches the placemats I've made recently - post to follow.
They are made from a 12 x 12in cardstock and scored with the help of my Ultimate Pro. To allow for the amount of napkins I put in, the height is 6.5cm/2.5in. The base is 17.5cm square or 6 & seven eighths dependant on which measurements you like.

I used the 'Walk in my Garden' Cricut cartridge for the die cuts. I used some left over fabric flowers that I used on my placemats. The centre point feature on the Cricut is excellent for this sort of fabric, as I was able to select a flower on the fabric and then cut (shadow 'daisy2'- page 85 of the booklet) the daisy shape around that flower; so you get a flower within a flower shape - love it! The yellow daisies were created with Cricut craftroom software to make the border. There is actually a border feature key on the cartridge but I needed mine to be straight and not slighty crooked as with the set border included. Since I had cut out the 'fillers' for the daisy2, I had some left over little orange circles, so I put them on the inside of the border and it's great (I.M.H.O) as I've now got little white daisies there.
Note to self- remember to cut the semi-circle cut away at the front of the box, BEFORE glueing it together!!
The little mini-egg cakes were a little idea of mine to decorate the dining room for the occasion of an Easter meal with friends.
Take care out there
Wednesday 4 April 2012
Lemon meringue pie - not cake!
Hello there
Now then. Should I start this post in a very confident tone or not?... mmmm.. not sure that's wise after my last 'lemon' adventure. In the oven as I type is a lemon meringue pie. It's got about ten minutes left to bake. Fingers crossed I've got this right.

I have to give a big thanks to my friend Jane who saw my last lemon post and took pity on me. She gave me a copy of a recipe from a very old (1976 published) Marks and Spencer book. That's the recipe I've used. Hey, that's handy! If it has all gone wrong, I can blame Jane!! Works for me! :-)
Everything went smoothly on the whole, other than Maggie and I getting in each other's way regularly. We had to nip to Asda whilst we waited for the pastry to rest as I don't have a flan dish nor enough eggs. I've gone through quite a few eggs this week.
The moment of truth has arrived. It looks fine although I'd rather it was more golden. We did have caster sugar sprinkled over the top and the oven was on 140c as instructed. I turned it up after the set time to 165c for ten minutes but still no golden. I could do with one of those gas burner thingies which chefs use at times like this.

We'll see what it actually tastes like at tea time.
Take care out there.
Date of writing = April 3rd 2012
Now then. Should I start this post in a very confident tone or not?... mmmm.. not sure that's wise after my last 'lemon' adventure. In the oven as I type is a lemon meringue pie. It's got about ten minutes left to bake. Fingers crossed I've got this right.

 |
| Poses are always necessary with Maggie :-) |
The moment of truth has arrived. It looks fine although I'd rather it was more golden. We did have caster sugar sprinkled over the top and the oven was on 140c as instructed. I turned it up after the set time to 165c for ten minutes but still no golden. I could do with one of those gas burner thingies which chefs use at times like this.
We'll see what it actually tastes like at tea time.
Take care out there.
Date of writing = April 3rd 2012
Tuesday 3 April 2012
A new baby is born
Hello there
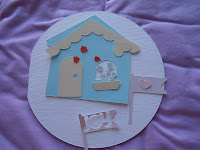
Yes, Bentley Blackwell is now on this earth with us all - let's hope it's a pleasant world for him to live in. Megan gave birth on March 23rd at 1p.m New Zealand time. 8lb12oz is no mean feat either, so well done Megan! All are apparently doing well and settling into a whole new routine.
 I should've made a card weeks ago but I've had an awful cold for two weeks, so I struggled to do any crafting other than the night out at Jackie's house when I did the canvas. As ever, it took me ages to decide on the design. I thought I was doing well on Sunday night, when I looked through some magazines and chose a card I liked but then yesterday, I had to change my mind as the card I wanted had a scalloped shape with holes in and I don't have anything to create that effect although a couple of images on some of my Cricut cartridges would've done but I decided to just stick with the circular shape. I looked through loads of cartridges and tried a couple of things which I didn't like, so time just disappeared yesterday as well.
Then, all of a sudden, I had it! That's it! That's the one I'm going to do! The inspiration was the image in the cartridge booklet, so I ran with that idea. The little sweet house with a heart on and flowers in the window is just so idyllic and yet childlike, so I thought it was excellent for a new baby card, as I'm sure Megan and Leyton's house is full of love and happiness right now as well.
.JPG)
I cut the circle card base from the cards function on Sweet Treats cartridge- I used fit to page on a 12 x 12 card. The house is on page 29 of Create a Critter booklet - you use the accessory function key. I used Cricut Craft Room to make sure that my sizes were all correct for laying onto the card base, so I'm not sure what size everything was. The flowers in the window are on page 69 of the Create a Critter booklet; I only glued the bottom of them, so they actually look slightly 3D which is great.
The flag is on page 28 of Create a Critter but the word was my own idea; yes, me with a good idea - very strange :-) I had considered putting Bentley's name on the flag and allsorts of things, then it came to me in a flash of inspiration again; the word 'joy' is highly relevant and fit in nicely using CCR and it's a word on the same cartridge - page 73 but I amended it by putting a circle from Plantin School book in the 'o' and then I cut a heart from there too to use instead; which was genius in my eyes.
.JPG)
Then I inked the edges of everything and glued it all on; including a button for the door knob, which I had tried to re-colour with some ink but not exactly successfully. Whilst waiting for the glue to dry, I got the stamping bits lined up ready. These are a very new addition to my stash and they're fantastic but I'm not great with them yet as I find the borders of the letters make it difficult for me to line them up properly, despite me doing several practise stamps of these whilst I was waiting for the glue. That's probably why they were dirt cheap.
I stamped the word 'joy' onto the envelope too and I'll put it in the post this afternoon and schedule this post for a week's time, to give the card time to arrive at it's destination.
.JPG)
I love the way I did the flag sign but I do think it needs a picket fence or something running horizontally across the card. I must search out my cartridges to see if there's something I can use as a fence in one of them but for now...
take care out there
Yes, Bentley Blackwell is now on this earth with us all - let's hope it's a pleasant world for him to live in. Megan gave birth on March 23rd at 1p.m New Zealand time. 8lb12oz is no mean feat either, so well done Megan! All are apparently doing well and settling into a whole new routine.

Then, all of a sudden, I had it! That's it! That's the one I'm going to do! The inspiration was the image in the cartridge booklet, so I ran with that idea. The little sweet house with a heart on and flowers in the window is just so idyllic and yet childlike, so I thought it was excellent for a new baby card, as I'm sure Megan and Leyton's house is full of love and happiness right now as well.
.JPG)
I cut the circle card base from the cards function on Sweet Treats cartridge- I used fit to page on a 12 x 12 card. The house is on page 29 of Create a Critter booklet - you use the accessory function key. I used Cricut Craft Room to make sure that my sizes were all correct for laying onto the card base, so I'm not sure what size everything was. The flowers in the window are on page 69 of the Create a Critter booklet; I only glued the bottom of them, so they actually look slightly 3D which is great.
The flag is on page 28 of Create a Critter but the word was my own idea; yes, me with a good idea - very strange :-) I had considered putting Bentley's name on the flag and allsorts of things, then it came to me in a flash of inspiration again; the word 'joy' is highly relevant and fit in nicely using CCR and it's a word on the same cartridge - page 73 but I amended it by putting a circle from Plantin School book in the 'o' and then I cut a heart from there too to use instead; which was genius in my eyes.
.JPG)
Then I inked the edges of everything and glued it all on; including a button for the door knob, which I had tried to re-colour with some ink but not exactly successfully. Whilst waiting for the glue to dry, I got the stamping bits lined up ready. These are a very new addition to my stash and they're fantastic but I'm not great with them yet as I find the borders of the letters make it difficult for me to line them up properly, despite me doing several practise stamps of these whilst I was waiting for the glue. That's probably why they were dirt cheap.
I stamped the word 'joy' onto the envelope too and I'll put it in the post this afternoon and schedule this post for a week's time, to give the card time to arrive at it's destination.
.JPG)
I love the way I did the flag sign but I do think it needs a picket fence or something running horizontally across the card. I must search out my cartridges to see if there's something I can use as a fence in one of them but for now...
take care out there
Monday 2 April 2012
Where's my mojo?
Hello there
I'm struggling as it feels like my mojo has taken a very long flight away from me and left me in the land of no creativity or drive. I haven't been able to craft all weekend and it's difficult either way as my craft room is the visitor room and we've had Chris's daughter with us for two weeks, so I can't use it. I've been using the kitchen table. Excuses, excuses, I hear all those of you who have to craft at the kitchen table all the time, shout at me. It's also half term, so my daughter is around so I feel a need to do at least one or two things a day with her; we went shopping for sandals today; unsuccessfully.
Ok excuses over, for now. I'll have my craft room back from tomorrow evening, so I better sort myself out or I'll get no sympathy; or should that say, less sympathy than ever?!
Today I've tried to seize my motivation back and started cutting out material to make some more placemats. I cut the spotty material 13 inches by 10 and the wadding was cut at marginally larger than that, just because that's how I like to do it.

Then to attack the bias strips for the binding. I looked at far too many youtube videos on a possibly more effective way of cutting the strips but I stuck with the old favourite as my head wasn't working and did I mention; my lack of motivation? :-) In very simple terms, I cut a square of fabric and then create a triangle. With the longest edge horizontal to you, cut the piece in half vertically. With the triangle on the right, create vertical strips the same width as you require your strips (mine were 2in) and then repeat that for the left hand side triangle.
I really need a full size self-healing mat as trying to cut with a rotary cutter with only a small one is rather fiddly to say the least and dangerous, as the cut on my forefinger will vouch for. I've only recently started using the cutter instead of scissors, so there's another purchase I need to make.
I then sewed the strips together and I now have a very long piece ready to be made into binding.
I don't have a bias maker either, so that's always fun. If I do decide to do more of these, I really will have to buy either the hand ones or a proper Simplicity bias binding machine, as there is a model which helps with covering piping too - they look like great tools.
I feel better just for writing this post actually. Wording the process I've been through has given me direction/hope in some way. I might even be winding my mojo back home.
Take care
I'm struggling as it feels like my mojo has taken a very long flight away from me and left me in the land of no creativity or drive. I haven't been able to craft all weekend and it's difficult either way as my craft room is the visitor room and we've had Chris's daughter with us for two weeks, so I can't use it. I've been using the kitchen table. Excuses, excuses, I hear all those of you who have to craft at the kitchen table all the time, shout at me. It's also half term, so my daughter is around so I feel a need to do at least one or two things a day with her; we went shopping for sandals today; unsuccessfully.
Ok excuses over, for now. I'll have my craft room back from tomorrow evening, so I better sort myself out or I'll get no sympathy; or should that say, less sympathy than ever?!
Today I've tried to seize my motivation back and started cutting out material to make some more placemats. I cut the spotty material 13 inches by 10 and the wadding was cut at marginally larger than that, just because that's how I like to do it.

Then to attack the bias strips for the binding. I looked at far too many youtube videos on a possibly more effective way of cutting the strips but I stuck with the old favourite as my head wasn't working and did I mention; my lack of motivation? :-) In very simple terms, I cut a square of fabric and then create a triangle. With the longest edge horizontal to you, cut the piece in half vertically. With the triangle on the right, create vertical strips the same width as you require your strips (mine were 2in) and then repeat that for the left hand side triangle.
I really need a full size self-healing mat as trying to cut with a rotary cutter with only a small one is rather fiddly to say the least and dangerous, as the cut on my forefinger will vouch for. I've only recently started using the cutter instead of scissors, so there's another purchase I need to make.
 |
| Alfie is wondering what on earth I am up to now |
I don't have a bias maker either, so that's always fun. If I do decide to do more of these, I really will have to buy either the hand ones or a proper Simplicity bias binding machine, as there is a model which helps with covering piping too - they look like great tools.
I feel better just for writing this post actually. Wording the process I've been through has given me direction/hope in some way. I might even be winding my mojo back home.
Take care
Sunday 1 April 2012
Lemon meringue cake - not pie!
Hello there
Yes, I've been baking again. Well, I have to really. I'm practising making this today with the idea that I can make it again next week for friends who are coming here for dinner. I had intended on making lemon meringue pie but couldn't find a recipe in our books, so I chose this as it looks yummy in Nigella's 'Feast' book.
---------------------
I wrote that paragraph yesterday- March 31st 2012.
 I'm writing this section, post baking. The good news is that I made my own lemon curd for the cake. No it isn't an April Fool's joke :-) The smell of lemons was very refreshing throughout the house and I did feel a sense of achievement as I think it turned out well and is really very easy.
It's now post the baking and there's not any good news about the cake I'm afraid. I took loads of photos at each stage, with the intention of doing a photo heavy post but I'm not going to bother. The sponge in the middle didn't cook properly, so I suspect I needed to put the oven on a lower temperature and cook it for longer. It's a sandwich cake with meringue on the outer and sponge in the centre, sandwiched with lemon curd and cream.
Chris's daughter eat a good slice, bless her and said she'd finish it off. I just didn't like the mixture of sponge with meringue.


They can't all be winners although Nigella clearly has success with it and likes it.
Sufficive to say, I won't be making this next weekend. I'll probably end up buying something in as I want to make something much more fun for the meal. View my next posting for details :-)
Take care out there
Yes, I've been baking again. Well, I have to really. I'm practising making this today with the idea that I can make it again next week for friends who are coming here for dinner. I had intended on making lemon meringue pie but couldn't find a recipe in our books, so I chose this as it looks yummy in Nigella's 'Feast' book.
---------------------
I wrote that paragraph yesterday- March 31st 2012.

 |
| My attempt at an 'arty' shot which is hard when the windows aren't exactly spotless and the fence there is falling down closer to the house :-) The rock is a dessert rose, Chris bought back from Morocco this month. |
It's now post the baking and there's not any good news about the cake I'm afraid. I took loads of photos at each stage, with the intention of doing a photo heavy post but I'm not going to bother. The sponge in the middle didn't cook properly, so I suspect I needed to put the oven on a lower temperature and cook it for longer. It's a sandwich cake with meringue on the outer and sponge in the centre, sandwiched with lemon curd and cream.
Chris's daughter eat a good slice, bless her and said she'd finish it off. I just didn't like the mixture of sponge with meringue.


They can't all be winners although Nigella clearly has success with it and likes it.
Sufficive to say, I won't be making this next weekend. I'll probably end up buying something in as I want to make something much more fun for the meal. View my next posting for details :-)
Take care out there
Subscribe to:
Posts (Atom)