Friday 24 May 2013

Phew!

Hello there 

I did it! Just in time too. I'm even pretty happy with it. 

Please see my last post in order to explain how this page came into being - check it out

I made a writing error with the journalling but I don't have
time to deal with that but everything else
went really well

I forgot to mention that I got some new buttons too yesterday, so I had to use them as well. 

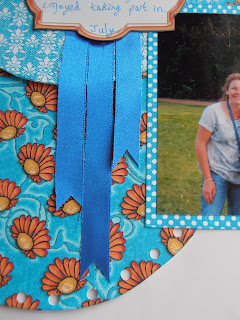
I loved using the hole screw tool to make holes all over the place, especially down the side of the page, as I thought of threading ribbon through it and the ribbon matches the ribbons on their medals in the photo. Rather pleased about that quick thinking.


The layout design from Catherine's blog, led me to have to put ribbons or equivalent down from the journalling, although in the layout, the photo was meant to go there. It now makes the journalling look a bit like a rosette, which is very apt for the subject matter. 

Go check the layout out for yourself and perhaps give it a go - don't forget to tell Catherine as she loves to see how other people interpret her designs.

I'm so pleased I achieved this goal I set myself tonight and with such success. I've still got lots of things left from the printouts I did, so I see me doing some cards or another layout with photos from that holiday, another day. 

I'm off on this current holiday now. I'm taking a craft project with me, so keep an eye out incase I get round to finishing it and blogging about it.

In the meantime, take care out there and 'live more, laugh often and love much'

Get it together Diane!

Hello there

Here's the deal. I've got a download package free from Crafter's Companion which has been sitting on my desk for a long time and every now and again I cut some flowers out and fiddle with it. I bought an X-cut screw hole punch yesterday in my first ever visit to a Range store; so cool! Catherine's layout of the month is sitting waiting for me to give it a try.
There's also the added complication of a couple of things. I'm busy listening to Lady Antebellum's Golden album full blast making it hard to concentrate and we're leaving the house at 3.30a.m tomorrow to go on hols. Can I do something in the short time I have available?

You'll have to come back in a few hours to find out, won't you?

Take care in the meantime

Friday 17 May 2013

Music No.2

Hello there

Oh dear my subject title reminded me of the song 'Mambo No.5 - I'm now singing in my head with a bit of a body wobble :-) - such a happy song though.

Here's the second of the scrapbook pages I've created using the freebie Music layout pieces and the cut-file, as described in my last post.
There are more photos and the journalling on the tags behind the
raised photo

The stitching work and the inking of
the letters with a Spectrum Noir pen
make alot of difference
Putting the layers at different levels
yet connecting letters to those,
made it flow so well


I really like how easily these came together. I've never done a double
page layout of any kind. With several photos for one event, I
could definitely be persuaded to try this again. 
If you're into your Cricut, I'd recommend keeping an eye on Cricut Craft Room in conjunction with the project page on the Cricut website, to give you ideas for what to do with the cuts.  I saw on Obsessed with Scrapbooking's blog that they have got two new layout based cartridges out which look great, so I'm going to have to be quick to get these preview type cuts done quickly before I have to buy a cartridge :-)

Take care out there

Wednesday 15 May 2013

Music

Hello there

This layout was done after I got inspired by a Cricut Craft Room cut-file from the Cricut project page. I found some free cuts on CCR which are items for various layouts but I needed to see an actual example of what those cuts could create and I loved the example using the music layout on that project page, so I promptly imported the cut file and got using the free dies - all FREE I say - how brill!

Sorry about the poor light but our weather is so bad, I can't expect it
to be much lighter during the day. I've used my daylight lamp, so
that stops the photo being yellow in tone but it's given alot of shine on
the M and U


The journalling is on a tag behind the photo


The background paper is fab; it's from the Stampin' Up Tickets and tags kit I think. The lines on it made it so easy to line up, as often my lining up is far from perfect. I also think it fits this theme/photo to a tee with it's grungy feel. Most of the papers are from Heidi Swapp's Sugar Chic pad; it's perfect for the colours and patterns in the photo. The silver/grey marbled effect paper has been in my stash for a long time; I hadn't thought it would die-cut very well but it was easy peasy and looks a treat.

The machine and hand sewing was great fun too and the washi tape, well, it just had to be done :-)


I'm going to have to get a few layouts done quickly whilst this is still going for free, as there are more photos of this night I want to capture and some other photos of another 'gig' my daughter went to a couple of months ago. I could do a double page layout of this night using the same papers as this and mixing it up a bit with the die-cuts and design.
Let's hope I get time, as 'him indoors' is back tomorrow from a holiday he's been on with his mum, so I might have to forego some crafting. How bad am I, that I am reluctant to give up that for a catch-up evening with Chris?! Don't get me wrong, I love Chris but I'm also a tight mare and don't want to give up the chance of using a freebie :-)

Take care out there

Sunday 12 May 2013

Have a look

Hello there

It's been a long time between posts (my fault, not Linda's) but a new article of mine has been published on The Crafty Network's site. It's an update on where I'm at on my 'crafter's journey'. It's not so much about what I've been crafting but about what I've done or not done about selling some of the things I make.


Go and have a look  at the post HERE . It's my fifth article for the site, so you may want to read some of the others too if you want to have a really good nosey at what I've been thinking/doing :-)

Take care out there

Saturday 11 May 2013

Not good

Hello there

Anyone got some happy vibes to send my way? If so, please share by commenting here.

That can be the good aspect about things like Facebook, as people who are feeling happy, share that on there and when I read it, it can help have a positive impact on me. Today it was Linda from The Crafty Network, who posted about having quite a few new likers of her page over night. The other was my friend Catherine who posted about feeling very upbeat because it's the weekend. Both these things have helped step up my mood a bit. 

I'm feeling rather fed up of British weather at the minute, as having the necessity to wear a hat in May as the wind and rain are bad, is not conducive to me feeling the joy of spring. I know people overseas will think that I'm just another whinging pom but I'm trying not to be by surrounding myself with positive people and events but it's a struggle sometimes. 'Him indoors' is also away on a cruise to Norway at the moment, so I've got added responsibilities at home now too and and and and...... ok, I'll stop with the whinging now.

Believe it or not, I didn't come on here to start sharing my woes, I had actually intended to just share some photos of a project I've just finished. It's a re-purposed draft excluder. Previously it was a draft excluder that I bought for our first Christmas in this house. It had Christmas applique on it and didn't have a way of washing the cover. I have to admit that it therefore was only vacuumed in two years. I had to cut the old cover off and then make a cover for the stuffing from an old sheet (old sheets should never be thrown away, as they can be so so useful). I used some gorgeous fabric I've had for quite some time and was previously used to make a cushion cover for my daughter's room
Incase you're wondering; this isn't me just being odd
by putting a draft excluder on an internal door -
the door goes into the garage, so it does
get quite a draft under there.

Since the cover was so easy, I decided to put some decorative stitching to sew the top seam over ( I so wish I had a machine with much more than 5 fancy stitches on- mine doesn't even do blanket stitch- uh oh, I'm whinging again! :-) ). To cover where the press-studs were attached I cut some felt hearts out and hand blanket stitched round them - so MEGA cute!
The stitching is rubbish (especially the first stitch) but
I loved doing it. I used to do proper embroidery at school
and this brings it all back to me; even basic blanket stitch.
 I'm really loving Mandy Shaw at the minute from Dandelion Designs and I bought her book 'Stitch at home' which has some fabbo projects in, which I'm keen to get started on but I have other projects on the go, which need to be finished first.

Take care out there

P.S Those of you who own dogs might realise that there's only one thing they think draft excluders are useful for..........

Nero has done that since he was a tiny puppy but he
forgets he's a big heffalump now, whose bum barely
fits on it :-)
I hadn't got the excluder down for longer than two minutes before he decided to take a pew :-)

Wednesday 8 May 2013

Howdy partner!

Hello there (back to the English accent, after my American drawl for the subject title)

Today's block is called The Yankee Puzzle. I've no idea why, as I don't recall hearing Kaye explain it in the Craftsy video for the 'Re-piecing the past' class I'm doing.


Yet again, it's pushing my boundaries further, step by step, which is a good way to develop. No issues with the Flying geese this time and I'm getting adept at sewing through several in a row, which makes it quite an efficient process. I also use the 'material scrap' method, where you always end stitching on a small remnant of fabric, so that you don't have to cut thread so often. It's meant to save thread but I'm having issues with my feed-dogs, so I'm not convinced I'm saving much at the minute but at least I'm learning good techniques.

Only one more block to go before I can get started on making the large cushion cover I'm using four blocks in. The next one is called The Temperance block.

Take care out there

Tuesday 7 May 2013

A very brave woman

Hello there

This is a Barbara Fritchie Star block. Apparently during the Civil War, she heard General Sherman and his soldiers coming, so she went to stand in front of her flag and said "you'll have to shoot me before I'll let you take my flag". He was heartened by her appeal and let her keep her life and her flag. Then they named a patchwork block after her; as you do! Women of strength and firm belief, often face strong threat but it shows how much of a social event, patch-working was then, as these stories evidently were told whilst the women chatted and sewed.

The main issue I had with this block was the flying goose section. Kaye's video explains about how to put together the three pieces which make up the goose ( the pointed part of the triangle looks like the formation geese make when flying together). To attempt a basic explanation of the problem, I need to explain that I cut my pieces with the Simplicity ez templates, which have a flat end to each triangle. The actual templates I used were the 'easy angle' (half square triangle) and the 'companion angle' (quarter square triangle). This will all sound quite confusing to none quilters/patchwork makers but I'm hoping it might help anyone who does an internet search for help with this block.

Kaye's advice  is to place flat end to flat end (of each fabric piece cut) at the point of the goose but I couldn't do that as my right hand section would be back to front if I did that. I did send a question in about this but on hindsight I realise that it was probably my fault having the fabric the wrong way when cutting it. It's a batik design and it can be difficult to tell which is the correct side with some parts of it. The 'light' fabric i.e the purple, is easy, as it's double sided..... it spent most of it's life being a sheet, then I machine dyed it and it's also helped make the curtains in my craft room. This block is going to become part of a large cushion cover in my craft room.

I resolved the problem by just putting the right hand side piece 'point to flat' instead and made it work fine but I will be aware of that in the future.

I'm still learning but I'm also still enjoying! 

Take care out there

p.s If you haven't been reading my blog lately, firstly I need to ask "why not?!!" No excuses allowed here :-)
Secondly, I need to tell you that Kaye England is the teacher of the Craftsy class I'm doing at the moment, called 'Re-piecing the past'.

Monday 6 May 2013

Superbamondo!

Hello there

I had yet another busy day the other day, trying hard to fit everything in from three dog walks, to taking dogs to groomers to doing household stuff and taking birthday presents to friend's house and very importantly, have tea outside as it was SUNNY! Yes, you read correctly, it was actually sunny and warm from about 8a.m onward. 

All day!

In between all that, I actually managed to complete the patchwork block below. I had cut the pieces for it the day prior but all the sewing was done fairly quickly on the one day.

I could definitely feel my learning curve slope upwards with
 the sewing of the half square triangles in this way. 


The video for this block; 'Birds in the air' was better than the Sherman's block video, as this one actually explained a little better how to sew the half square triangles together. You place the flat end of the cut triangles on top of each other, as shown below and then flip over to sew along the diagonal edge and put the pointed end towards the needle, as that flat end is the 1/4inch seam allowance. It sounds complicated just with words but in the video, it could've been done better in my opinion.

I'm really chuffed with how quickly I did this and the final block isn't too bad; it certainly doesn't stand up to close scrutiny but there's quite a few good seams in there.
I intend on using this block, along with the next three blocks I learn, all in one large cushion cover and it'll go in my spare room/craft room.

     --------------------------------------------------------------------

One project which was definitely not done quickly was Chris's birthday card. It seemed to take ages, as it used paper I printed from a cd. When I'd created the K-card base, I then chose the papers and images I wanted to use and printed them off separately and then set to the tonnes of fussy cutting necessary - that might seem like an exaggeration when you look at the card but just take my word for it. 


What I should have done was print the design onto the card base first thing before creating it. 


Then when I went to make the envelope the stupid 'Spray and Slide' made a right royal mess over the front of it. So what does every good crafter do when a mistake or mess happens? We cover it over; hence the embossed and cut out shape on the front with his name on it and the feathers glued all over. I had wanted to use those spare feathers anyway (yet another printing error), so that wasn't the end of the world for me but I just had to be quite careful where I put them.
My rather old Spray and Slide can is now in the bin

He seemed to like it, so "job's a good 'un" I suppose but I'm not happy with it due to the final product and the time and faff, it took me to make it.

You can't win them all.

Take care out there

Friday 3 May 2013

Being cheeky, works

Hello there


I am rather pleased with this card.

I've been cheeky, as I used a stamped image I got when I was on the Indigo Blu retreat in March. I did use some green on the leaves too but it's not that visible in this photo. I just wanted to add the slightest bit of colour to the image, to help maintain it's elegant pose. We were also given the pages from a copy of the Pride and Prejudice book at the retreat, as the image is of Elizabeth Bennett. I've yet to show you one of the projects we did with this book paper at the retreat, as I'm not happy with it yet; I still need to work on it to get it how I want it.

I cut the flower out of vellum using the Flower Shoppe cartridge- it's the scallop flower on page 13 of the booklet. The swirls in the background were created with a stamp I made from the lace 2 element on page 42 of the Ornamental Iron 2 cartridge. I used some leftover cuts I had of that element from a post I did last month - I put them behind the flower, as I've seen Sue Wilson do so many times and finally I get round to trying it out myself. 


Inside the card, I had a bit of a play and used vellum as the insert and stamped the swirl on it and the sentiment. What I quickly learnt is that vellum absorbs the ink and makes it swell out. I've got away with it on the swirls but the sentiment became illegible, so I had to stamp it again on the card and stick it over the old imprint. I'm not sure it's completely worked and be warned if you try it - be patient! Give it time to dry.


The box envelope was easy to create with my Ultimate Pro but the fun bit was stamping with white Stazon on acetate. I hadn't done this before. Ranger's Archival ink didn't seem to work i.e it didn't dry; which is odd as it did when I made the box for my Mother's Day present box  this year. I made the mistake though of asking Chris, who has a chemistry background, about what to use to clean my stamp with afterwards - therein followed a long speel about the various types of solvent inks and how they react and blah blah blah but he did help me realise that IPA was worth a shot and it worked!! I used the swirl stamp (which was created with Cricut cuttables) on an acrylic block and it cleaned them brilliantly without disintegrating them. One happy dance later and the box was complete.


Take care out there


Wouldn't it be cool if I really could have a swirl pattern
painted into the lawn with that stuff they use on
footall pitches :-)

Related Posts Plugin for WordPress, Blogger...