Friday 29 November 2013

Mad panic

Hello there

.....Oops! Only just realised that I never published this, so you're getting this post today instead of the one I promised you yesterday. If you didn't read yesterday's, then you're not disappointed :-)

                                --------------------------------------------------

Last weekend I was given a short sharp awakening; I was told that it was my step-dad's birthday on November 17th. I know this of course but I had forgotten and therefore hadn't made a card at all. Having two days in which to think of a design and actually make a card, isn't normally enough time for me, what with the rest of life still going on as busy as ever. But was I beaten?! Oh no, not this little madam!

He loves all sorts of sports and car racing is one of them. With that knowledge, years ago, I bought a decoupage set of black and white images of male related stuff. This set has proved valuable many times and although I don't particularly like it, it certainly does the job for male cards, who, let's face it, really aren't that bothered by them. After saying that, they would get upset if they didn't get one. 

George appreciated the design but I think he preferred the duck meal which Chris made for him on Sunday. Truth be told, I rather liked the meal more too :-)


I went to town decorating the envelope too


There were two more cars on the same sheet, so I decided to go for it and make them into cards too. My dad's birthday is on December 4th and he loves cars too.


I got the chequered flags and background from some images online, as my computer was dead for most of the weekend (grrrrr, don't remind me!) I had to use my daughter's; much to her disgust.


Take care out there

Thursday 28 November 2013

I am still around

Hello there

No, I haven't disappeared off the face of the earth; although you may not notice as I do seem to spend one heck of alot of time in my room at the moment. I've been busy sewing like a mad thing for the orders I have for 'A Place to Set' and for the Christmas fair I'm doing this Saturday. I may even manage to not mutter on for ages in this post but don't hold your breath.


That's one of the sets of portable coasters I've made for the fair. I love the effect the metallic thread has on them; I think it makes them look quite professional. They'll be great for a New Year's eve party.

Here's another set I've made for an order.


I'm so happy with the buttons I found
to use on this set

I'm in the middle of sewing up four other Christmas sets but you've seen them before.

I've also completed two Christmas themed placemat and coaster sets but I'll not spoil you today and I'll post about them tomorrow.

Me? Cruel? Surely not!?

Take care out there

p.s. See! Totally mutter free zone; I can do it! :-)

Wednesday 20 November 2013

A squircle

Hello there

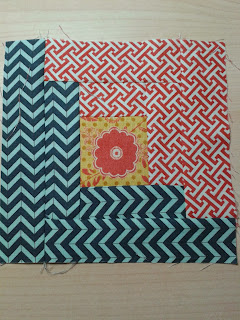
Yesterday, despite being shattered as I normally am on a Tuesday, after the early starts of work, I completed another block using a log cabin technique. 


First of all is the worst bit which is the cutting of 56 strips of fabric; the widest of which is 1.5inches. My eyes were going skew wiff with the lines on the mat making it hard to see where the edge of the fabric was, with those zig-zag lines on the fabric too.


You make up a block of 6 x 6in, like this.


Then make three more.


The way I chose to put the blocks together creates a kind of circle made out of squares, which my daughter immediately called a squircle, which I think is genius! 

Then to match that fun (although I was exhausted when I finished at 10.30), today at class I made a part-sewn seams block, which was really enjoyable. I'm finding my short time there every fortnight is complete therapy for me; just me and sewing with other ladies who want to be doing that too. Bliss.

Wendy showed us yet another great quilt of hers using this technique and it had flying geese blocks around the edge, so I think I might do that around the edge of this and then decide what to make it into after that. It might make another cushion cover in this craft/spare room as my other one has the light blues and batik fabrics in it. We'll see.

Take care out there

Saturday 16 November 2013

Computers are a pain

Hello there

'Headquarters this I'm saying the words into the iPad and it's typing for me'! I should probably explain that that sentence was typed by the iPad. Not bad going really, being as what I really said into the microphone button on the keyboard was "how cool is this? I'm saying the words into the iPad and it's typing for me". It did the post title for me too! I remember seeing about computers of the future on 'Tomorrow's World' over 30 years ago but never thought you'd be able to do that on a portable device for goodness sake! But I'm having to use the iPad as my computer is in trouble again, so  not everything is good about technology. So I'm using The Blogger app which I never find to be half as easy to use as the computer version.

This week I've also had to get used to varifocal glasses , Chris has been away for most of this week (as he was last week) and I'm feeling very behind with orders for 'A Place to Set' and the craft fair on November 30th AnD my mum reminded me yesterday, that it's my step dad's birthday tomorrow!!! I was in the middle of doing the card for that when I had a break in proceedings to wait for glue to dry, so thought i'd do a blog post as therapy.Basically I'm telling you that I'm a bit stressed at the minute but hey, it's the Season of stress = Christmas - bah humbug! 


Did any of you see the Children in Need show last night too? I did and realised why I normally don't watch it, although I do donate; it's just such an emotional thing to watch, especially when you're feeling 'off' anyway. Some families have a ton of very difficult things to cope with, so it does help put my own little concerns into perspective for me.

That photo is of some bunting I've  finished today, as the ribbon arrived. I do have to confess to loving that ribbon. It's grosgrain which is a weakness of mine; the colour is fab and the width is perfect and the design is exactly what I wanted. I trolled t'internet the other day for what felt like hours but was only about 1, sourcing a few things I need for current projects and this ribbon was about the only thing I found to suit. It's going to go around my craft fair stall and at the rate I'm going it'll have to go on sale too,  as I won't have much else! 


Me? Exaggerate? A stressy knickers? .....  Surely not?! 


Anyway, I'm off now to get this 'ere card done.

Take care out there and don't do as I do,do as I say and don't stress! 


Sunday 10 November 2013

Ay ay cap'n!

Hello there

Here's a quick little post that I'm scheduling for November, as I've just sent them off in the post (it's October 12th on me typing this) but the little boy who they're for, lives in New Zealand and he's not 3 until November 10th. I'm rarely early for these things and I know from past experience that if I don't send them now, I'll probably forget until the day before, which won't be any use at all!

This is the fun little 5"x5" card I made for him. He's fascinated with pirates right now, so he should love it. I loved the background I found for it on Craft Artist in the seaside kit. The font is from Craftartist too but I can't remember which kit I used. The die cuts were found on the Boys will be boys Cricut cartridge, which was a last minute ('oh no, looks like I'll have to buy a new cartridge', I said to myself) find, as the Cricut Craft room search hadn't bought up any items from the cartridges I own. Ha! You can't beat me that easily! Money saved too.

I also made him some bunting to hang in his room. I bought the fabric at The Grace and Favour shop up in Thornton Cleveleys, where I seem to have been alot this year, despite it being an hour's drive away.


I tried to cut the blue pirate fabric to show a different pirate item on each triangle.

On the back I appliqued Ollie's name on some plain blue fabric triangles, to make sure that the letters could be seen properly. I used the same fabrics to make the letters though. 


I'm sure Megan his mum will have it displayed by the time of this posting, as they're at least 9 hours ahead of us. If you're reading this Megan, I'd love to see some photos of it up in his room :-)

Take care out there

Saturday 9 November 2013

Forever young

Hello there


I love the big floppy flowery hat on the envelope
Here's a card I made for a surprise 40th party for a friend who does a lot of work for our local community and is just a lovely lady. There was a 70's theme to the party, so a pair of flared stripey trousers was a must and some large flowers. The song 'forever young' came to my mind after seeing a card called 'Forever 40' when I was looking for inspiration. 

I've got the words of the song printed off and put inside the card.


I used the Forever young Cricut cartridge to get the woman's image from too and the flowers. The font for the words on the front of the card and the 'Happy Birthday' on the inside of the card, come from the Plantin Schoolbook cartridge. The paper was a lucky find in my stash from K&Co.


And before you ask, yes, that hat was worn at the party. It had to be done.

Take care out there - peace and love to you sisters!

Wednesday 6 November 2013

Choices

Hello there

Today I've been able to make some fun choices. I went to my quilting class with Wendy Deverill. I missed the last class due to being on hols but today's really felt 'jointed', with the group gelling quite nicely. There's only two more left this year, so I'm sure we'll all be a settled group by then.

We were working on log cabin today, which I've done versions of before but this was much more structured than what I've done previously.

 After making this one 6in square block, I went on to make three more exactly the same. What? That doesn't sound so much fun, I imagine you saying but it's a good way to get your confidence and skill up, as you're repeating the same action. They're mostly 1.5in wide strips of various lengths (other than the 2.5in square centre piece), so not too bad for the cutting out either.

With the four blocks all sewn, you then have four choices as how to sew those blocks together to make a 12in block. Which do you prefer?

A


B

C


D
They've all got good things about them and any would have done the job but I decided upon :


I'm still not sure what I'm going to do with all these blocks I'm making in the classes but it's still fun learning the correct techniques in the friendly, informative environment.

Take care out there

Sunday 3 November 2013

Facing continual challenges

Hello there

Oh wowsers, what an evening and morning I've just had! I'm not referring to the hideous rain and wind we've had the last couple of nights either! I'm referring to me trying yet another new project. This one was a stained long sleeved t-shirt. Of course the stain wasn't somewhere nice and easy; it was right between the neckline and the shoulder seam. I saw a tutorial on the Urban Threads website for using embroidery patches to cover holes in clothes which got me to thinking and then I got to doing. I also watched a couple of Nancy Zieman videos but they all mention allsorts of adhesives, stabilizers and fancy stuff which I just don't have but I was not deterred!

A woman on a mission! Or should that read that I'm a nutcase! You decide :-)

Using Vanish on stains on a t-shirt doesn't always
work in your favour :-(
I've never embroidered onto clothing before and my regular readers will know that I'm a newbie this year to machine embroidery of any kind, so this was indeed a huge learning curve for me. This is stretchy fabric but I was surprised as to how resilient it actually was to the close sew of embroidery.

My intention had been to find a large flower design to cover the stain. Not too thick a design though to overweigh the fabric. There lay my first mistake; I didn't position the hoop in the right place over the stain and position the design correctly on the software, so the flower was too small and not in the right place. I still reinforced previous learning about how to change the size of a design on the software and how to reposition it but in hindsight, I should've used the large hoop to give me more leeway as where to position the design.

After sewing on the flower design I chose out of the software's pre-existing designs, I could still see too much of the stain for my liking, as the flower was too far down. I initially tried to fit in the sun within the same hoop but after an initial try, realised that it was going to overlap the flower but only after I'd started sewing it of course. Hence followed some unpicking but thankfully not too much.

I had to work out how to move the hoop and yet support the fabric, as the first piece of stabilizer didn't cover all of the new area and there was no fabric in the top right hand side of the hoop. So I came up with the idea of only partially ironing on more stabiliser behind the area and yet leaving enough of it around the edge for it to be secured within the hoop. I hope the photo helps to explain that, as the chalk marks I made on the fabric show where the hoop will sit. Only the section of stabiliser behind the fabric was actually ironed. The stabiliser I had is only 8in x 8in.


I even printed out the design so that I could practise place it onto the fabric whilst the hoop was in place:


I do wish the inner hoop had grid markings on it too!


Are you all sensing a 'ta dah' moment now? 

It ain't gonna happen, just yet! When I went to sew it again, my machine threw a total dippy fit and chewed up half a mile of top thread causing embroidery mayhem! I was surprisingly calm though and carried out the rescue attempt without swearing once, although I did manage to cut a tiny hole in the fabric too! 

I was tempted to throw in the towel at this point but no, I'd come this far and had nothing to lose; I couldn't let my machine beat me now!

After putting everything back in place and doing a practise sew, I went to it! 

It worked until I got to the last block of the design (which was only a tiny bit of black edging round the centre of the sun) and it didn't feel right within seconds of starting, so I abandoned it. Enough was enough and I don't see what black has to do with a sun anyway.

And breathe!

The top is still wet from when I rinsed the
chalk off


Hardly a ta-dah worthy moment really as you can still see the stain but hey, I finished it! I've learnt alot and all of this gives me more experience and reinforces my attitude that just because you don't have all the fancy stuff some of these tutorials show us, for allsorts of various projects, you can use your initiative and vary the technique to suit what you do have. Be creative!

The sun is finally out and we haven't had a shower in quite a while and there doesn't appear to be a gale blowing, so think I've deserved a .... walk with the dogs! Woop woop! :-) What a life I lead.

Take care out there and be determined to achieve your goals
Related Posts Plugin for WordPress, Blogger...